Welcome!
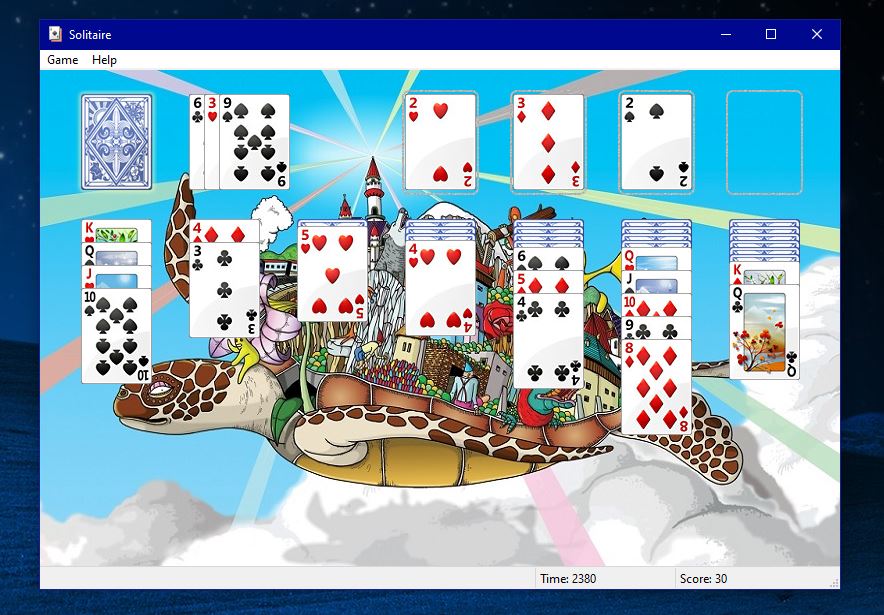
Custom Solitaire Background - A Simple But Fun Mod
Written 5th May 2026
Want some cool new backgrounds on your Solitaire? I just did this messing around with some DLL files
one night, it is a fun and basic mod that you can do in minutes. There are lots and lots of little
things in Windows that you can mod in this way, I highly recommend that you mess around with these
tools and see what you can change! (in a virtual machine perhaps…)
First things first, I did
this with the old Solitaire from Windows 7/Vista, this mod will not work the same way on the modern
store app version. Personally, I think the modern version sucks, it is subscription based and full
of ads. If you would like the old one back, you can download it along with the other classic games
here.
With that said, let’s get started. Use a tool such
as Process
Explorer
to see which DLLs the solitaire.exe process has
loaded. Make sure you go to View and select Show Lower Pane, and set the pane view to DLLs. With
that done, scroll down the list or search to find the Solitaire executable. Click on it, and you
will see that it is making use of quite a few DLLs. After a while, you will start to know what a lot
of these are. Most of them provide system-wide functions to programs and Windows itself, and are not
specifically related to solitaire.
Hint: the one you want is called CardGames.dll
:)
Process Explorer also has descriptions of most DLLs, these can be helpful in identifying
what you are looking for. Next go to this file in explorer, and make a copy on your desktop. Open it
using Resource Hacker
or a similar tool (unless you feel like doing it manually using the API!) and
expand the Data folder on the left side and go down to BACKGROUNDS\FELT.jpg (or whichever one you
wish to replace). Right click it and go to replace resource then select file. This will open a file
pick dialog, make sure whatever image you pick is the same format and the same size, you can see the
size of the current resource image at the bottom of the window in Resource Hacker (I just resized
mine in MS Paint). You will also need to replace the other image file ending in X2, e.g.
BACKGROUNDS\FELTX2.jpg, with another copy of your image at the correct size. This is so the
background image can resize appropriately when you make the solitaire window full screen.
As
you may have noticed, there are a lot of other things you could change in here, e.g. replace the
.wma sound files, change aspects of the animations in the xml files, change the thumbnails, and so
on.
Next, click the save icon in Resource Hacker, this will save both an original copy and
the modified one to your desktop. Then all that is left to do is drop that file in the same
directory as the original (the path of CardGames.dll is
C:\Program Files\Microsoft Games\Solitaire\CardGames.dll.
You will get prompted as to whether you wish to replace the file
with the same name, click yes and give admin permission. Now you can open up solitaire and should be
able to see your new background! I may add to this post later with instructions on how to change the
thumbnails, so stay tuned!
Year 30k? An interesting experiment
Written 10th March 2026
I wrote this little program a while back when I first started learning about the Windows API. For less than 20 lines, it has given me a surprising amount of entertainment and learning value! All it is doing is creating a struct representing the time you want to change the system to, and then passing it to theSetSystemTime() function. If you set the year to some absurd value,
it can cause a
variety of problems to occur, and I found it rather interesting to watch this unfold.
#include <Windows.h>
#include <stdio.h>

int main()
{
	SYSTEMTIME time;

	time.wYear         = 29999;
	time.wMonth        = 12;
	time.wDayOfWeek    = 6;     // this gets ignored by the function anyway
	time.wDay          = 31;
	time.wHour         = 23;
	time.wMinute       = 50;
	time.wSecond       = 0;
	time.wMilliseconds = 0;

/* Passes a pointer to the systemtime struct from above */
/* If it fails, print the error and return 1 to the OS */

	if (!SetSystemTime(&time)) {
		printf("Failed to set system time. Error: %lu\n", GetLastError());
		return 1;
	}

	printf("System time updated.\n");
	return 0;
}
To explain it a bit further, the year value of the
SYSTEMTIME struct is a 16 bit
unsigned int
(called WORD in WinAPI) meaning that it should be able to accept values from 0 all the
way to 65535
(2^16 - 1). However, there are at least two factors preventing this from being possible.
Firstly, Windows restricts the valid value internally to the range of
FILETIME. It is
used to keep
track of time in various system components including NTFS. FILETIME is a 64 bit value
that counts
100 nanosecond intervals since the 1st of January 1601, 00:00:00. It is like the Unix epoch of 1st
Jan 1970, if you have ever seen a file in Windows randomly have a date in the 17th century, this is
where that value comes from! Supposedly the Windows epoch was chosen as it lines up with the 400
year cycle of the Gregorian calendar (making some of the leap year math easier), although I could
not find any info to confirm this for certain. Anyways, the point is this 64 bit value (I think it
is called a Qword) can only store the 100ns ticks until the year 30827.
The second reason the year cannot be set that high is that Windows simply won’t let you! I have had almost no luck getting the year to stick much above 5000. However, I have not been able to find out why exactly or what really determines whether the year value is acceptable. There is next to no information that I could find about this topic online or in any other material I have read. With the year set at 5000, you can still observe some interesting behaviour, but this experiment has left me with more questions than answers.
In-Place Upgrade to Windows 11
Written 5th September 2025
If your computer is still running Windows 10 but does not support 11, you do have a few options if
you still want to receive security updates. You can
get extended updates for Windows 10, install the LTSC version, bypass the requirements to install
11, or maybe even install Linux!
If you do choose to upgrade, there are a few ways to bypass requirements that you may have seen floating around the web (Rufus, for instance). However almost all of these require a 'clean install' - essentially meaning that you have to completely wipe your existing Windows installation and start fresh. This is of course rather annoying, as you would have to install all your programs again and restore your files from a backup that you hopefully did correctly! So here is a nifty little method to upgrade your unsupported computer to 11 and keep all your files, programs, settings just as they currently are.
- Make sure everything is backed up. Preferably have a saved system image in case anything goes
wrong.
You
can
do this by going to
Control Panel > Backup and Restore (Windows 7) > Create a system
							image.
Back it up to an external drive. This will contain all your personal files as well as those needed for Windows to run.
- Download the Windows 11 ISO image from the Microsoft website.
Scroll down to “Download Windows 11 Disk Image (ISO) for x64 devices”
Select the option that appears, and click confirm at the bottom of the page. This should take
about
15
minutes or so to download.
- Next, find the ISO image in your downloads folder, right click it, and select ‘Mount’. The ISO
image is essentially a digital version of a DVD which you will use to install Windows.
- Once it is mounted, you will need to access it via the command prompt. First check in file
explorer to see which drive letter has been assigned to the mounted ISO. Next, type
cmdin the run dialog box (Win + R) and press ctrl + shift + enter to run the command prompt as admin. Type the drive letter, (e.g. E:) to change directories to the correct drive. Then typecd sourcesto change directories to the sources folder of the Windows ISO.
- The last command you need to type is
.\setupprep.exe /product server. The installation process should start shortly after this. This command ‘tricks’ the installer into thinking that it is installing Windows Server, which does not check your computer for any of the usual requirements needed for Windows 11. Don’t worry though, it is just installing regular Windows 11, whichever edition is equivalent to the edition of 10 currently installed on your computer.
- It will ask you a few questions soon after starting, go with the default option to ‘check for
updates’, as this will prevent you needing to do it later. Accept the EULA, and make sure to
check the ‘keep files, settings, and apps’ option when this appears, this should mean that after
the upgrade, your computer will be exactly as you left it.
- Next, the main part of the installation will start. It will take a little while and restart a
few times, if you have an SSD (which you really should if you are planning to use Windows 11...)
then it should take no more than half an hour.
- If it has all been successful you should see the new Windows 11 welcome screen and you should be
able to log in to your regular account like usual :)
Instructions
A few final things:
There are a few things you may find quite different about Windows 11 coming from 10; however most of
these are easy to change so it is more familiar. For instance, the start menu being in the middle
instead of to the left side. This can be changed by going to Settings > Personalisation > Taskbar >
Taskbar Behaviours and set alignment to left. The right click menu in Windows 11 also has fewer
options and they are in different places. You can get the good old Windows 10 menu back by running
the following command as
administrator:
reg add "HKCU\Software\Classes\CLSID\{86ca1aa0-34aa-4e8b-a509-50c905bae2a2}\InprocServer32" /f /ve.
If you have any issues with the computer after the upgrade and would prefer to go back to Windows
10, you have 10 days to do so, just go to Settings > System > Recovery > Go back. This will take
about an hour and will return your computer to how it was before installing Windows 11, including
all your files.
This is by no means an exhaustive list of the tweaks you can make to it, but these are beginner
friendly and
simple to do. I may write more about this subject at some point in the future.